


A decoder tester is actually a test fixture that allows you to easily connect a decoder to a DCC test track and check the decoder to make sure that all aspects of it are functioning correctly. Why do you need one?
Two keys issues:
-
Spending your time installing a working decoder -- PRIOR to spending all of your valuable time installing it, wouldn't it really make sense to confirm that the decoder is working correctly?
-
Manufacturer's warranty provisions - You would be well advised to review the man's warranty provisions on any given decoder, PRIOR to starting the installation. For example, Digitrax's warranty on mobile decoders is tied to your performing a pre-install decoder test BEFORE starting the installation, and the warranty ends once you start installing the decoder.
As a result of these types of considerations (both time spent installing and warranty considerations), it is strongly recommend that all decoders be tested before starting the installation. From personal experience we can tell you that it is very frustrating to completely install a decoder only to find that the decoder is not working properly!
Decoder testers are also handy when you have a problem with a decoder and would like to test it outside of the locomotive. We've also used them when we want to program a decoder prior to installation.
If you only plan to do one or two decoder installations, then perhaps you can make do without a decoder tester. If you plan to do more than a few installations, we think a decoder tester is a worthwhile investment. You can either build your own decoder tester, or purchase one of the commercial ones currently available on the market.
Building your own tester
Railroad Model Craftsman ran a do-it-yourself article by Jeff Scherb on building a decoder test fixture. The article appeared in the September 2001 issue. If you are considering building your own tester, you may want to get a copy of this article, as it will provide more details on building such a test fixture.
Purchasing a commercial product
At the time this page was last updated, there are three commercial decoder testers on the market.
Loy's Toys produces a Decoder Tester assembled and ready to use. You will find more about it on their web site at Decoder Tester. The Loy's Toys tester is available direct from the manufacturer as well as other DCC dealers.
NCE sells the DTK -- a pre-assembled decoder test kit. You'll find more about it on their web site on the Accessories page. The DTK is available from any DCC dealer carrying NCE products.
Digitrax sells the LT1 Tester for Decoders & LocoNet Cables. More information is available on their web site. It is available from Digitrax dealers, and at this time this page was written, the LT1 is also included with Digitrax starter sets.
Like all things in life, all decoder testers are not created equally. Each of the models above has different features and appears in the market at a different price point. So if you planning to purchase one, be sure to compare their features before making your purchase. Some features you may want consider:
- Size - of the decoder tester and any required cables; not an issue if you plan to primarily use it on the bench, but may be more important if you plan to carry it in your tool bag
- Price - how much of your hobby dollars do you want to invest in such a device?
- Time required to Connect & Test - since some of the decoders you will likely test, will have loose wires (i.e., no plug) on the locomotive side, the time required to connect and disconnect and test such a decoder may be an important factor.
- Connection type(s) supported - In addition to loose wires, decoders also come with a variety of plugs - the more common ones are a 2x4 plug (NMRA Type M), a 9pin JST socket on the decoder, and some smaller decoders with a 1x6 plug (NMRA Type S)? What kind of plugs can be easily tested? A worthwhile note on this topic is that one may be able to extend the type of connections supported by a decoder tester using various wiring adapters and/or harnesses.
- # of Simultaneous Connections - Another factor related to connections is if it is possible to make all decoder connections to the tester simultaneously, or are you required to test a subset of connections at a time? This is probably more important if you think you will be testing more than just a few decoders. Note: No commercial decoder tester on the market at this time provides for speaker connections for testing sound decoders, nor do any of the commercial units allow the connection of more than 6 functions at one time (F0F, F0R, F1, F2, F3, and F4)
- Plug & Play Decoders - Plug and Play Decoders (decoders usually without wires and plugs, and perhaps with special plugs) may present an interesting connection challenge, and if you are likely to use these types of decoders, you may want to consider how you would connect them to the tester.
A final thought is that regardless of the tester you select, it is usually possible to extend the commercial tester to make some connections easier. Here are a few extension & upgrade ideas to consider.
NCE Decoder Test Kit
1) )
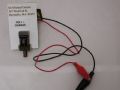
) The NCE DTK is very compact decoder tester, with significant flexibility. But it leaves packaging to the user. The image at the left shows what you receive in the package (along with a user guide). The image at the right shows just the tester itself. (Click on any thumbnail to see a larger image.) I carry my NCE DTK in my tool bag, and extended my DTK with the following modifications/additions.
The NCE DTK is very compact decoder tester, with significant flexibility. But it leaves packaging to the user. The image at the left shows what you receive in the package (along with a user guide). The image at the right shows just the tester itself. (Click on any thumbnail to see a larger image.) I carry my NCE DTK in my tool bag, and extended my DTK with the following modifications/additions.
- mounted the tester to a piece of 0.040" styrene to provide a base that won't damage the tester if comes in contact with metal. (You could also add rubber feet to the base if desired.) Double sided foam tape was used to attach the DTK to the styrene
 a small motor was connected to the motor connection points. (I used an old N scale motor with a flat frame I had in my parts box.) The motor was then epoxied to the bottom of the styrene to hold it in place.
 - I cut a pair of red and black jumpers with alligator clips, and attached one of each color to the track connectors, following the color code as indicated on the DTK. This makes for very easy connection to the programming rack or mainline.
- In addition to my name (from one of unending supply of return address labels that arrive in the mail), I also made a note on the base reminding users that pin 1 of the 2x4 socket/plug is the orange wire.
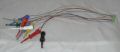 The DTK comes with two harnesses (see photo above). One has 9pin JST plugs on both ends for each testing of decoders that have 9pin JST sockets on the decoder. The other has a 9pin JST plug on one end, and loose wires on the other. I attached E-Z Hook Micro Hook test
 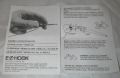 connectors on the loose wire ends to make it easy to test either plug and play decoders or decoders with loose wires.
 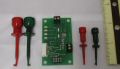 I considered both the E-Z Hook Mini Hook test connectors and the E-Z Hook Micro Hook test connectors (both show in the image to the right so you can compare the size), before settling on the Micro Hook connectors due to their smaller size to carry in my tool bag. The photo to the left shows how the Mini/Micro hook test connectors are attached to the loose wires. Either will work, and both are available from Digi-key or other E-Z Hook distributors (about USD$17-18 per set )in a nice 10 piece set, with one of each of the colors required for the nine wires of the JST with a brown connector left over. The part numbers are:
)
)
)
)
|
E-Z Hook Test Connectors |
E-Z Hook Part # |
Digi-key Part # |
|
Mini Hook (10pc set) |
X100W-S |
461-1015-ND |
|
Micro Hook (10pc set) |
XM-S |
461-1006-ND |
Loy's Toys Decoder Tester
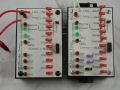 Loy's Toys Decoder Tester is the decoder tester I use on my bench. It is a little larger than the other two, but on my bench, storage space is not a large issue. And I've upgraded it to make testing a little easier. Here is a photo of the stock Decoder Tester (on the left), and my upgraded decoder tester (on the right). (Remember that you can click on any of these thumbnails to see a larger photo.) I made the following upgrades to my unit :
- mounted a small motor and permanently connected it to the gray and orange terminals
- mounted a speaker, and added three nail clips & a capacitor to make it easier to test SoundTraxx sound decoders
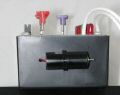 In the photo at the left you can see the motor as I mounted it. I drilled three small holes in the end of the tester near the clip leads to the track. One hole (to the left in this photo) is where the wires to the motor are run, and the other two holes are used to pass a cable tie through to hold the motor in place. Like the NCE DTK upgrade, I used a small DC motor that was in my parts box. Remember to leave the wires to the motor somewhat long so that you can have the cover off of the decoder tester to make other changes. I soldered the motor wires directly to the pads for the gray and orange nail clips on the underside of the board. And I put the locking tab of the cable tie inside the box for a neater finish.
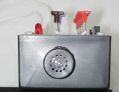 In the photo at the right you can see how I mounted the speaker on the opposite end. I used a Miniatronics speaker -- part #60-078-01 -- an 8ohm 7/8" round speaker, 9/16" high, and already in a case. This was an easy install, since I just had to drill two small holes behind the speaker for the speaker connection posts to pass through, and then hot glued the speaker to the end of the box.
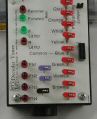 On the face of the decoder tester I drilled three small holes (5/64") to add three additional nail clips. You can see them in the photo to the left. I added two violet nail clips, and one brown nail clip. With this size hole, the nail clips fit very tight. I also added some hot glue on the underside to give them more stability. The fit of the nail clips was tight enough that I needed to use my hammer to push them down. Be very careful if you do this, as it is possible to bend the nail clips. If you intend to do much of this, your best bet would be to get the T20 nail clip driver from E-Z Hook which has been designed expressly for this purpose. The reason I added three nail clips instead of two is that I have the two violet nail clips (10 piece pkg, E-Z Hook part #81-1-S VLT, Digi-key part #461-1247-ND) connected to the speaker connection posts. And I have a 16V 47μfd bi-polar capacitor connected on the underside of the board between the brown nail clip (10 piece pkg, E-Z Hook part #81-1-S BRN, Digi-key part #461-1241-ND) and the lower violet nail clip. With this approach if you want to test a older SoundTraxx decoder that needs the capacitor, you can connect one speaker wire from the decoder to the brown nail clip and the other speaker wire from the decoder to the top violet nail clip. If you are testing the newer SoundTraxx Tsunami decoders which have a capacitor already wired in, then you can just connect the two speaker wires directly to the two violet nail clips.
Note: this second upgrade with speaker, additional nail clips, and capacitor is designed specifically to test SoundTraxx decoders. Other sound decoder manufacturers use different ohm speakers and thus I would recommend testing in the standard manner. If you primarily use another manufacturer's sound decoders, you should be able to make similar improvement to the decoder tester to speed testing of that manufacturer's sound decoders.
Copyright © 2002-2006. C. M. Greene. All rights reserved.
webmaster@mainerailroads.org